
How to Change or Edit your WordPress Main Menu Navigation
In this WordPress video tutorial, we demonstrate where to go to edit your WordPress main menu. We'll show you how to add a new page or external link to your main navigation menu of your WordPress website. Please note that this tutorial demonstrates the classic WordPress menu editing experience. If your theme is a block-based theme using the full site editing experience, check out this tutorial instead.
The video demonstrates the whole process, but step-by-step instructions can be read below.

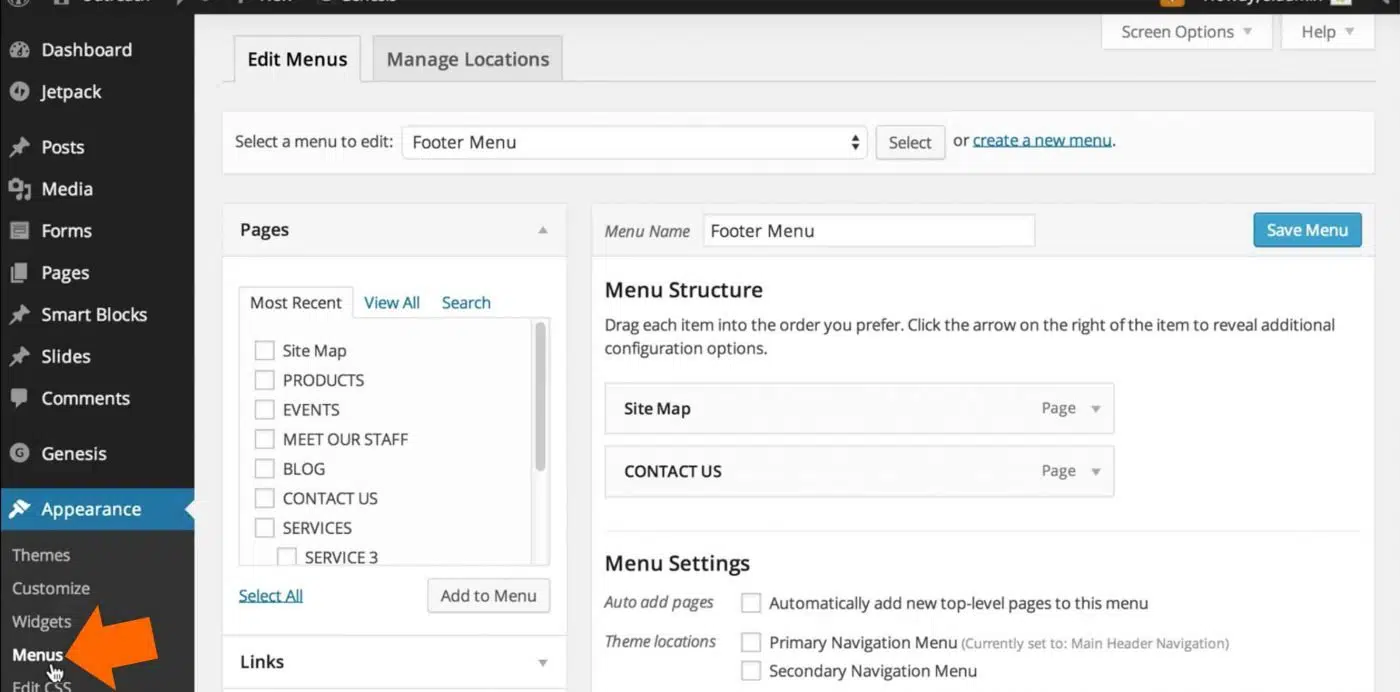
1. Navigate to "Appearance", and then "Menus" underneath Appearance in your WordPress dashboard.
On this screen, you'll be able to see all of the menus that have been set up for your website. (Is 'Appearance, Menus' missing? First, check if you have admin level access. If that is not the issue, then check if your theme is possibly using the Full Site Editing (FSE) experience. If it is, the menus are edited in a different way.)


2. Select the main menu from the list of menus, and click 'Select' so that the menu that we're editing is the correct one.
On this screen, you'll see on the right are all of the items that are currently in the menu. The hierarchy of the subpages is indicated by the indentation of the item.


3. Add a new menu item, rearrange items, or edit the navigation button labels as needed.
On the left side, click the checkbox next to the item you want to add to your menu, and then click the 'Add to Menu' button. This is a drag and drop interface so it's very easy to just rearrange all of the items in your menu. Every time you add something to your menu, it adds it to the bottom of the current menu. So, you need to go 'grab' it and pick it up and drag it where you would like it to be in the navigation.


4. Click the 'Save Menu' button to save the menu items that you have added, edited or rearranged.
After you click the Save Menu button, it's always a good idea to go check that the menu updated as expected on the live website, and your web design is still intact.
More About Updating Menus in WordPress in 2022
This post/video was created using WordPress version 4.01 back in 2014. As of October 2022, the process still works in largely the same way, but there are a few new things noted below.
- Now you can also get to your navigation menu by going to, 'Appearance', then 'Customize', then 'Menus'
- The 'Save Menu' button is now located at the bottom right of the page.
- You can now use the 'Bulk Select' checkbox option to select multiple menu items for deletion at one time.
If your WordPress looks very different, or you can't locate the menus in the same way the video shows, let us know in the comments below, or in the Youtube comments for the video, and we'll try to help troubleshoot. Some WordPress themes may present the menu options slightly differently.
Is your WordPress website working for you?
Learn more about leveraging your WordPress website to meet your business goals and keeping it safe and protected for visitors.
Does your business generate enough new inquiries? Download our free guide to learn how to generate new inquiries while you sleep using a lead generation system to automatically nurture and educate your prospects.

Are you keeping your WordPress website protected? Download our guide to understand how to evaluate your WordPress maintenance and support plan, plus tips that will help you make improvements today!


